If you want to buy a TIG welder, there are a lot of options to choose from.
For hobbyists and small business owners there are some really good, relatively inexpensive inverter welders available for TIG welding.
But what features should you consider for a TIG welder?
- POWER SUPPLY AND MAXIMUM AMPERAGE
First you need to look at what kind of power supply you have available, because it has to be compatible with the welder.
There are two voltage ranges a welder can operate on: 110-127 V or 220-240 V. There are also welders that need three-phase power, but they are mainly used in the professional field.
For a TIG welder that has a power supply of 230 volts, you can expect around 200 amps of current. Welders that run on 115 volts can produce up to 140 amps.
How many amps you need for your welder, mainly depends on the type of metal you’re going to weld, and the thickness of it.
It is very important to look at the amperage range before purchasing a welder. After all you don’t want to end up with a welder that cannot handle the thickness of the material you want to weld. Unfortunately, in some cases you don’t always get the amperage you’d expect. You often see this with poor quality devices from unknown brands.
When a TIG welder has something like “TIG 200 AC/DC” on it, you may assume 200 amps is the maximum amount of current you can get when using direct or alternating current. Most times this is true, but on some devices the maximum amount of current you can get with direct current is lower than with alternating current. You can check this by looking at the technical specifications of the device.
- CURRENT TYPE
Direct current and alternating current
So what is direct and alternating current? We’re not getting into those details here, but what you need to know is whether you’ll need it or not.
A TIG device provides either a direct current, or both direct current and alternating current.
Which one you need depends on the type of metal you’re going to weld.
You can weld almost any type of metal using TIG welding, and most of them need direct current. But some require alternating current, like aluminium or magnesium. So if you’re not planning on welding one of those two metals, you can go for a DC device, which is much cheaper.
TIG AC: Aluminum and Magnesium Alloys
TIG DC: Steel, Stainless Steel, Nickel Alloys, Brass, Titanium, Chromoly
- CONTROL PANEL
Arc ignition
There are three different ways to ignite the arc with a TIG welder: a high frequency start, a lift arc start or a scratch TIG start.
A high frequency arc start allows you to initiate the arc, without the electrode touching the material being welded. When the electrode nears the workpiece, the arc is generated by a high voltage, that will jump the gap between the electrode and the workpiece. Because the electrode does not touch the workpiece, contamination of the electrode as well as the workpiece, is avoided.
Most times, HF arc ignition is the preferred method. But, pay attention to any electrical or electronic equipment in the near area, because the high voltage can cause interference problems.
That’s why TIG welding devices with HF arc ignition, also often have the option to ignite the arc using the lift arc method. This is a method where low power is supplied to the tungsten electrode. When you place the tip of electrode in direct contact with the workpiece, and lift off the tungsten, the arc will establish. There is a small chance of contamination, because the electrode touches the workpiece, but not so much as with the Scratch TIG method.
With the scratch-start method you have to start your arc by striking the workpiece with your electrode, while on full weld power. Chances of contaminating your electrode or workpiece are highest using this method. And it also takes a bit of practice to learn how to strike the arc properly.
Welding devices with a scratch TIG option are not primarily meant for TIG welding. It is typically used on a welding device, which is designed for stick welding only.
Welding cycle
Now we’re going to go through some of the basic controls that you want to have on your TIG welder.
Depending on the device, the controls can be very simple or very complex.
On the most simple devices, you can only adjust the amperage. The other settings are pre-set by the factory. We recommend that as a minimum, you get a device where you can adjust the downslope and the postflow.
Let’s look at these settings in a simplified TIG welding cycle.
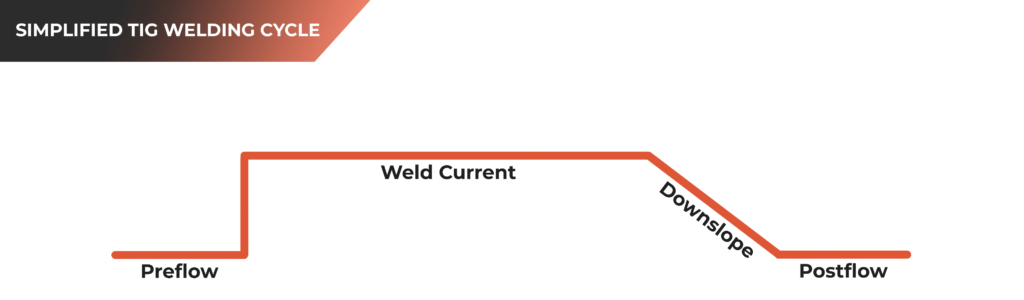
When you start welding, and press the torch switch or foot pedal, the welding process starts with a flow of shielding gas that eliminates the air out of the gas cup, and conducts the electricity to start the arc and ensures that the electrode and weld puddle is protected. This is called the preflow. Next, the current rises to its maximum amperage, and you can start welding.
When you’re done, the welding current will slowly go to it’s final current, before it reaches zero.
The so called downslope, controls the fall of the welding current at the end. It allows the metal to slowly solidify and helps to prevent craters and crater cracks at the end of the weld.
After the final current has stopped, there is a postflow of shielding gas to protect the tungsten and the end of the weld from contamination.
When the postflow is pre-set in the factory, it is typically set at five seconds. But ideally, you’ll need one second of postflow, for every 10 to 20 amps of current. So when you have a preset postflow and you’re welding at lower amperages, you may not need those five seconds and gas will be wasted.
When welding with higher amperages, you may want a postflow that lasts longer than five seconds, because the end of the weld and the electrode need some time to cool down and be protected.
Therefore we recommend that you get a device on which you can adjust the postflow, as well as the downslope.
We won’t discuss the more complex settings of the welding cycle here, but we will dive into two other settings which can be useful: the pulse setting and trigger control.
Pulse Setting
When you set the weld current on your device, it’s usually set to one fixed amperage level. With pulsed TIG welding, it continuously switches between two amperage levels: a high and a low amperage level. This reduces the overall heat input used to make a weld.
The metal will be penetrated as peak amperage is reached, and it will cool off with the low level amperage. This will reduce the heat input and therefore reduces the chance of distortion of the metal. This is especially the case when welding thinner metals, or metals that are susceptible to warping, like stainless steel and aluminium.
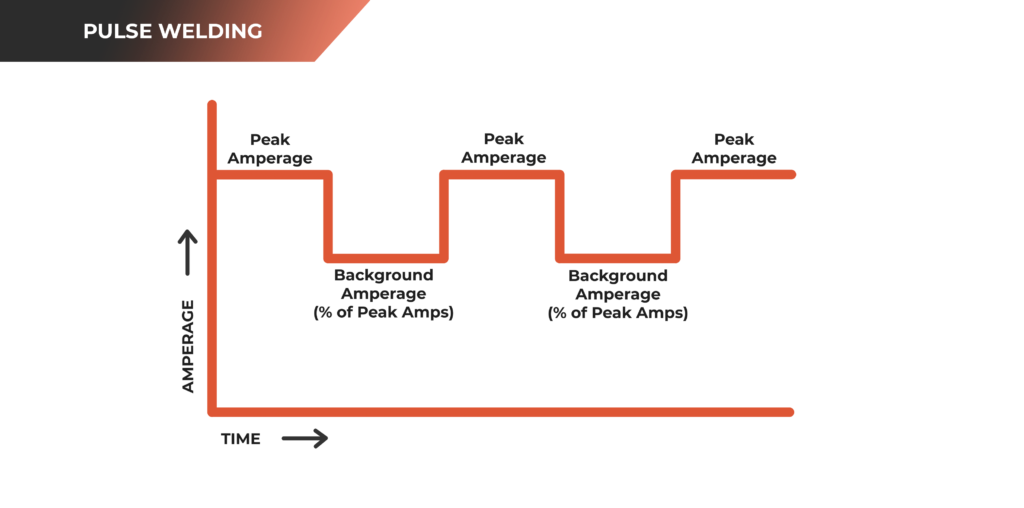
Each time the current switches from the low level amperage to the high level amperage, there is a pulse.
How many times this happens in one second, is the pulse frequency. Known as PPS or Hz on your welding device. The PPS or Hz setting is basically how fast or slow you want the pulses to be.
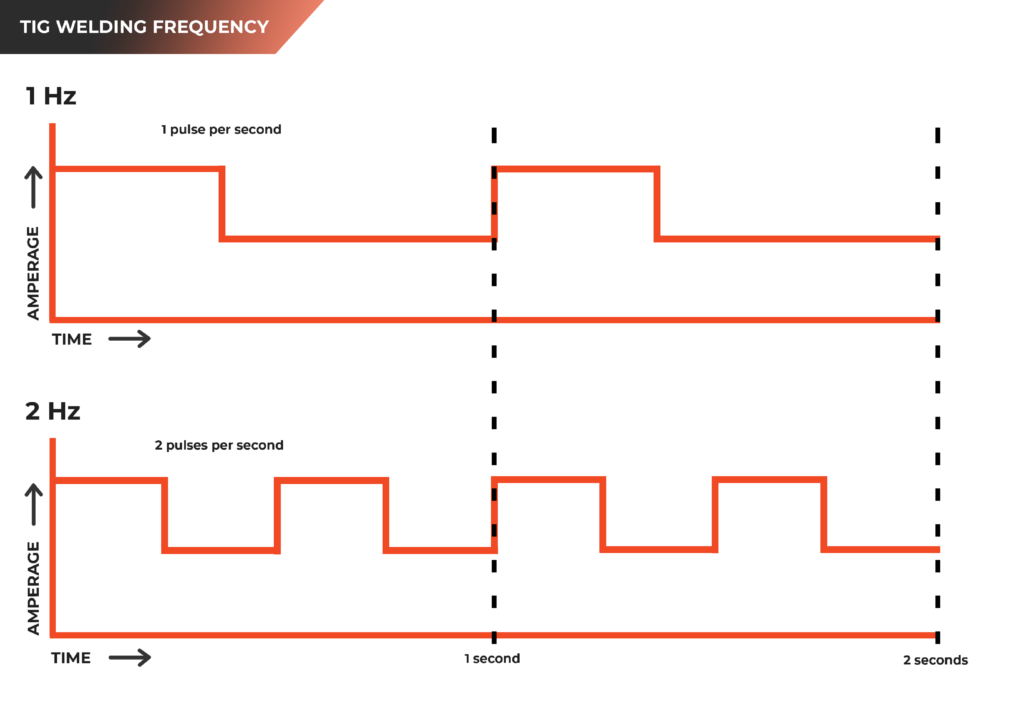
The higher the frequency, the smaller the arc and weld puddle become. A slower frequency, like five Hertz or lower, produces a nice fish-scale appearance to welds.
So, the pulse function is a great option if you need good penetration while keeping the heat input down. But, for basic TIG welding, you can definitely manage without it.
Trigger Control: 4T/2T
The 2T/4T stands for two touch or four touch operation. It tells you how many times the torch trigger needs to be touched to start and stop welding.
In 2T mode, you press the torch switch and hold it down to weld, and release it to stop. This is a simple operation for beginners, and also ideal for short welds, tack welding and stitch welding for example.
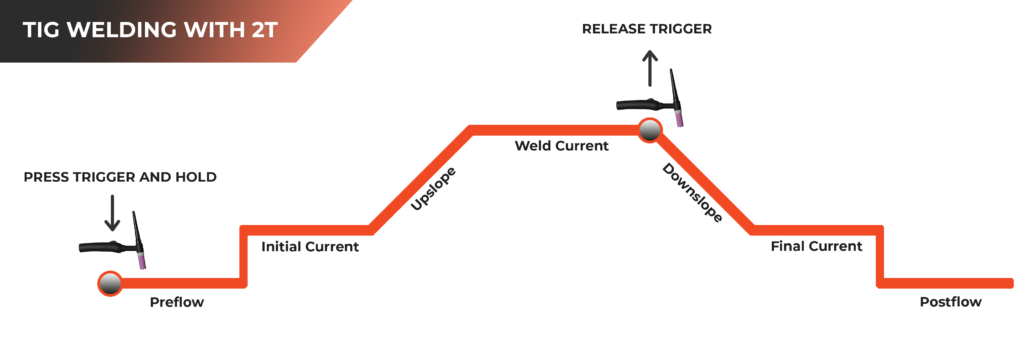
2T Mode: Press the torch trigger to weld and release to stop.
The 4T setting is particularly useful when doing long weld runs. You press and release the torch switch to start, weld without holding down the switch and stop by pressing and releasing the switch again.
Using the 4T setting, you have more control over the stages of the welding cycle. By pressing and holding the trigger when you start welding, you can preheat your work, and by pressing and holding it at the end, you can precisely fill your crater by gradually cooling the weld down. It’s also possible to gradually cool down the weld with the 2T setting, by manually ‘pulsing’ at the end of your weld. When the amperage starts to taper off, you press the torch switch or foot pedal again to keep the puddle flowing and repeat this several times, until you have filled the crater.
Not all TIG welding devices have a 4T setting. It’s not a necessity, but it can be convenient if you do long weld runs or wish to have more control over the stages of the welding cycle.
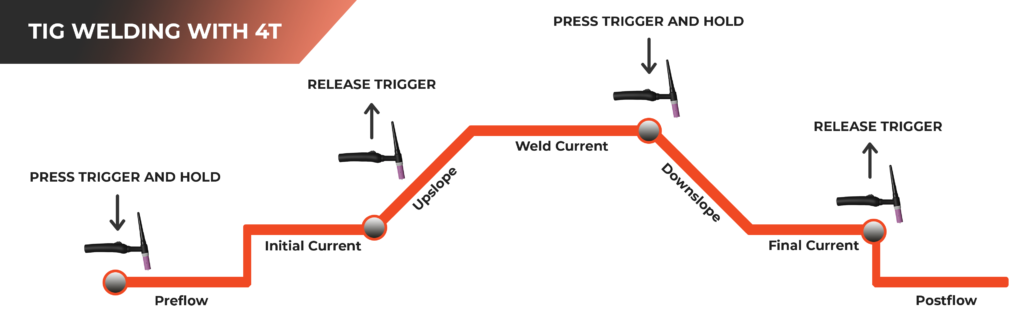
4T Mode: Press and release torch trigger to start, weld without holding the trigger on and stop by pressing and releasing the trigger again.
- CHARACTERISTICS OF THE WELDING DEVICE
Duty cycle
The duty cycle is a characteristic of a welding device and is important in the selection of a TIG welding device, if you want to do long weld runs.
The duty cycle is the length of time the welding machine can be welding, within a 10-minute period of time, at a given amperage, before the device shuts down to prevent overheating.
* (*in some European regions this is five minutes)
It is displayed in percentages on the rating plate of the welding device. Each ten per cent represents one minute of welding in a 10-minute period.
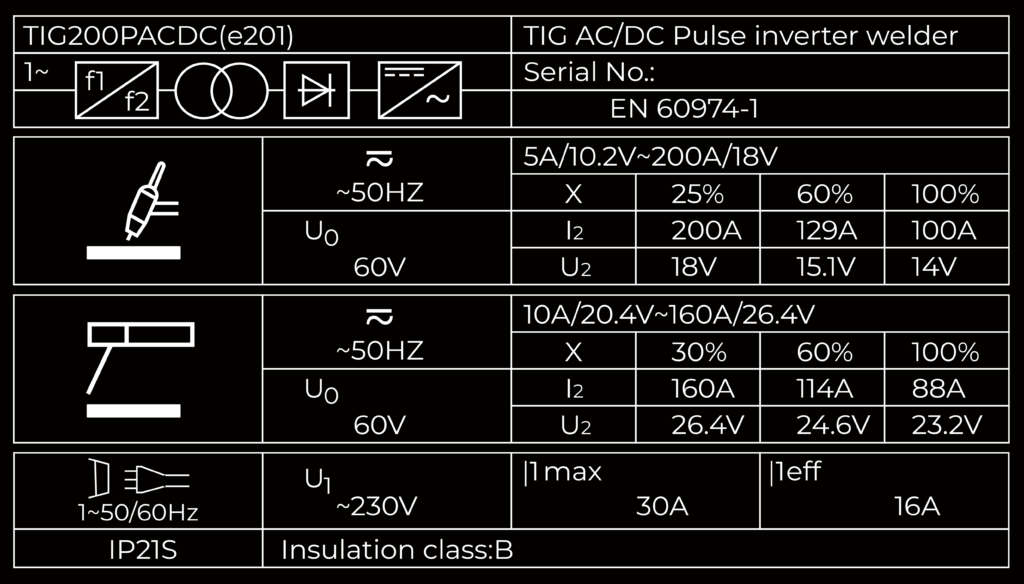
So if your device says this: -150 A at 16 V, 30% duty cycle -, you can weld for three minutes at 150 amps, and after that you need to stop for seven minutes, because the device needs to cool off.
When you run a lower amperage you get a longer duty cycle.
A short duty cycle can become a problem if you want to weld at higher amperages for longer amounts of time. But if you’re not planning on doing this, the duty cycle may not be the most important factor to consider when buying your TIG welder.
Dimensions and weight
Portability is a factor that you have to consider before purchasing a TIG welding device, if you need to do a lot of mobile work, where the machine will be regularly transported. So if you want a device that’s relatively easy to move around, check out its size and weight before purchasing one. And don’t forget that the bottled gas would need to be portable, as well.
- REMOTE AMPERAGE CONTROLS
There are two ways to remotely control the welding amperage: a torch switch and a foot pedal.
Torch
A torch can have a handle with a switch, paddle, (thumb) wheel or slider, to control the amperage. Torches come in various shapes and sizes. The sizing is standardised, meaning that you can find compatible consumables for different sizes of TIG torches.
They are rated at a maximum amperage. So if your device has a maximum amperage of 200 amps, and your torch is only rated at 125 amps, you’re limited in what you can do with it.
TIG torches can be air-cooled, or water-cooled. An air-cooled torch works fine, but when turning up the amperage the torch can become really hot and then you may be better off using a water-cooled torch. Water-cooled torches circulate coolant to expel heat from the torch which allows you to weld at higher amperages for longer amounts of time. They also have a smaller head which can be good if you need to work in tight spaces. But for that you can also get a smaller size torch, or make it smaller using consumables like a stubby gas lens kit.
What kind of torch and consumables you need depends on the job and your personal preference. Most people start off with an air-cooled torch. Torches that are probably most popular under beginners are the number #17 air-cooled torch or the #20 water-cooled torch.
Foot pedal
A foot pedal is another way to control the amperage of your welder.
With the pedal fully pressed, you’ll weld with the amperage you set on your device. If the weld gets too hot, you can ease off the pedal and lower the amperage. Even though you may not always know the exact amperage you’re welding with (unless you fully press in the pedal), a foot pedal does allow you to have better control over your weld, which can improve the quality of it. It is particularly useful when welding thinner metals and aluminium, so that you don’t burn as easily through the base metal.
A foot pedal is particularly good for bench work, but when you want to move around more or need to weld out of position, it can be more difficult. Nowadays there are also wireless foot pedals available, which allows you to have more freedom of movement, because you don’t have to drag the cables around.
When you think of buying a foot pedal, make sure your TIG device supports one, because not all devices do.
- MULTI PROCESS DEVICES
Nearly all TIG welders have the capability to process stick welding as well, which is great for when you need to weld outside where it’s draughty or if you need to weld metal that isn’t clean. You do need a stick welding electrode holder for this, and many times they don’t come with the device so you’ll have to buy one separately.
But if you also want to use other welding processes, like MIG welding, you can go for a multi-process device. This may not only save you money, but it will also save some space which is great if you only have a small workspace.
Unfortunately, quite often the TIG capabilities on multi-process devices are limited. Many of them don’t have a high frequency start, which also means they don’t accept a foot pedal. And most multi process welders are DC TIG only. This means you won’t be able to TIG weld aluminium, because you need a multi process welder with AC/DC TIG for that.
- COST
Now that you know most of the basic features, you have to ask yourself the question: how much do you want to spend on a TIG welder? Prices vary from under one hundred euros to a few thousand euros.
The cheapest way to TIG weld is to transform your stick welding device to a TIG welding device. But the only way to start the arc is by using the scratch TIG method. The tungsten can contaminate your weld and you’ll have to turn off the shielding gas manually, so you’ll end up using more gas.
It’s best to purchase a device that is dedicated to TIG welding only, which often has the capability to process stick welding as well.
If you’re not planning on welding aluminium or magnesium, you can start with a DC device, which is cheaper than an AC/DC device. This will probably save you a few hundred euros.
The cheaper models of TIG welders have been reported to have arc stability issues, which can have a negative effect on the look and quality of your weld. But this doesn’t mean you’ll have to buy an expensive TIG welder to get a good stable arc. There are many good entry-level options out there with which you can make great welds.
Other factors that will influence the price is whether you’ll go for all the additional options and controls, if you want a particular brand or not, and whether you’ll want technical support in the future and a warranty.
CONCLUSION
If you’re still not sure what it is you’re looking for, you can fill in this form, to get a free customised list of your options, based on your needs.
One Response
Thanks for your blog, nice to read. Do not stop.